|
 Day 10 was a half day, so filed under 9a, not 10. I did other things in the studio as well, after three or four hours of work on this. Day 10 was a half day, so filed under 9a, not 10. I did other things in the studio as well, after three or four hours of work on this.
I am now on the top layer, which means I’m much more than halfway to where I’m going. Every time I paint from now on, I’ll have a guide to tell me how to paint and where, which is the lower layer. All that working out was slow, and now it’s done I need to deepen the colours, tidy up the unclear points, and amend the painting to remove errors. As a matter of fact I also have to colour the drapery at the bottom, or decide to leave it white, but that’s already shaped as well, so to make it better is far easier than just making it.
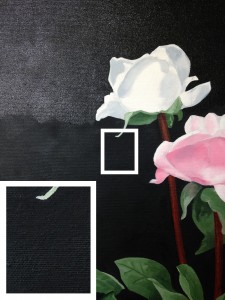
There are two problems with the black background. First of all, it’s dry. Dry oil paint looks a bit sunken and sad, and there’s no gloss to impress people. It can also be patchy. Second, and far more annoying to me, it has pinholes. When you put a paint cover onto canvas, it doesn’t always fully fill the gaps. When the canvas is white, this really shows through. I’ve blown up a part of the canvas here. If you click on the picture and zoom in, you can see white blurs in the larger rectangle. Once the paint no longer has a gloss on it, those show up, but while it is wet they look like a twinkle, and they can’t be spotted easily.
I can solve both of these problems with a second layer of paint. I mix it with a medium that is partly oil, and that will make it shine more, and also make it flow better. The shiny area at the top of this picture is where I have repainted it, and the duller part is where I have not. Once this is fully dry I have other methods of applying shine, but having it not sink in the first place is a good start.
Along with the finishing of the background, I fully defined a few edges using the black, and covered a few smears and fingerprints. That was three-plus hours of painting; I took most time going around the edges, with a small square edged brush and a very small pointy one. I also took some time to consider which edges to go around.
|