|
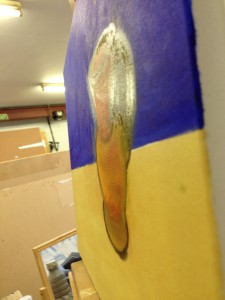 When an oil painting is finished, it’s not finished; an artist still has to do a few things. The first challenge is that some paintings ‘sink’, losing their freshly painted look. Areas can go dull, as the oil retreats from the top layer of the paint, to the layers below, or the ground, or as the polymerisation process exposes pigment with less oil over it. Organic blacks are particularly bad for this. As you can see in the picture to the left, shininess varies over the surface. The just-painted look is ideal, but it does not stay even. To deal with this, add a layer of oil over the top when you notice sunken areas. I leave most pictures at least a month before trusting them not to sink, but usually you can spot the problem areas earlier than that. When an oil painting is finished, it’s not finished; an artist still has to do a few things. The first challenge is that some paintings ‘sink’, losing their freshly painted look. Areas can go dull, as the oil retreats from the top layer of the paint, to the layers below, or the ground, or as the polymerisation process exposes pigment with less oil over it. Organic blacks are particularly bad for this. As you can see in the picture to the left, shininess varies over the surface. The just-painted look is ideal, but it does not stay even. To deal with this, add a layer of oil over the top when you notice sunken areas. I leave most pictures at least a month before trusting them not to sink, but usually you can spot the problem areas earlier than that.
When oiling out, I use the same oil on top of the painting as I used in the painting. If it is a light colour or a light to medium blue, I use poppy oil. Otherwise, I use linseed. (That prevents the colour of the old oil from changing the paint colours; all those lovely dark Constable clouds make me twitch.) I use a mix of oil and odourless mineral spirits. (Pedant alert: I think the OMS is fine in this context as it’ll evaporate leaving the layer flexible.) If I used pure oil, it would cling so hard that I’d not be able to spread it. Mix up something that can be applied nicely – practice on a canvas board or a failed painting, until you have the right consistency. For me, it’s about 50:50. Paint it onto the painting with a soft brush, to get a thin, even coat. At this point you should not be in danger of damaging your surface, but a hard bristle brush might bring up a little pigment. You want the paint to be capable of gripping the new oil, if possible, so that it is never merely added to the surface. Only paint it on the sunken areas. Make it a very thin layer. You should not have to dab off excess, but if you do, lint-free cloths are your friend.
Now, wait. If any areas sink again, reapply the oil to them, and repeat until done. Then wait again – the time when you stop adding oil is the time you should write on your stretcher bar as the date from which to time your varnishing time. Do not varnish until this oil has had time to dry. Then sit back and admire; you’ve made a painting look better.
|
